

Smart pool controllers have revolutionized how homeowners manage their swimming pools, offering convenience, efficiency, and peace of mind. By centralizing control of your pool's equipment—from pumps and heaters to lighting and water chemistry systems—these controllers enable remote monitoring and management through smartphone apps or voice commands.
Whether you're upgrading an existing pool or implementing automation from scratch, this comprehensive guide will walk you through the process of setting up your smart pool controller for optimal performance. We'll cover everything from preparation and installation to configuration and troubleshooting, ensuring you get the most from your investment.
Before You Begin: Preparation and Planning
1. Assess Your Pool Equipment Compatibility
Before purchasing a smart controller, inventory your existing pool equipment to ensure compatibility:
- Pump type and model: Different controllers support different pump brands and types. Most premium controllers from Pentair, Hayward, and Jandy work best with their own brand equipment, though many offer cross-compatibility.
- Heater specifications: Note your heater make, model, and communication protocol.
- Lighting system: Identify whether you have standard or color-changing LED lights.
- Sanitization method: Document your chlorination system (traditional, salt water generator, etc.).
- Additional features: List any water features, spa functions, or automated cleaners.
If you're unsure about compatibility, consult the manufacturer's specifications or a professional pool technician. Some systems like Hayward's OmniHub are designed to work across brands, while others may require adapters or additional hardware.
2. Select the Right Controller for Your Needs
The three major players in the pool automation market are Pentair, Hayward, and Jandy. Each offers various models with different capabilities:
- Pentair IntelliCenter: Premium option with touchscreen interface, extensive customization, and excellent energy management.
- Pentair IntelliConnect: Entry-level option for basic remote control of essential functions.
- Hayward OmniLogic: Advanced system with excellent voice assistant integration and user-friendly interface.
- Hayward OmniHub: More budget-friendly option that maintains core functionality.
- Jandy iAquaLink: Strong option for those already using Jandy equipment with intuitive controls.
When selecting your controller, consider:
- Budget: Complete systems typically range from $500 to $3,500 depending on features.
- Feature requirements: Do you need basic scheduling or comprehensive control of multiple features?
- Expansion plans: Will you be adding pool features in the future?
- Smart home integration: Which voice assistants or home automation systems do you currently use?
For a more detailed comparison of available systems, check out our Smart Pool Controller Comparison Guide.
3. Gather Necessary Tools and Materials
Standard tools for installation include:
- Screwdriver set (Phillips and flathead)
- Wire cutters/strippers
- Electrical tape
- Voltage tester
- Drill with bits
- Level
- Mounting hardware
- Wire nuts and connectors
- Waterproof sealant
Additional materials may be required based on your specific installation requirements. If your controller requires internet connectivity, ensure you have a strong Wi-Fi signal at your pool equipment location or consider a Wi-Fi extender.
4. Safety First: Electrical Precautions
Working with pool equipment involves electrical components, often at high voltages. Take these essential safety precautions:
- Turn off power: Always shut off power at the circuit breaker before beginning work.
- Verify power is off: Use a voltage tester to confirm no power is flowing.
- Follow local codes: Ensure all work complies with local electrical codes and regulations.
- Consider professional help: If you're uncomfortable working with electrical systems, hire a certified electrician or pool professional.
According to the National Electrical Code, pool equipment has specific requirements for wiring, grounding, and circuit protection. Familiarize yourself with these requirements or consult a professional.
Installation Process: Setting Up the Hardware
1. Select the Mounting Location
The control system should be installed:
- Within 5-10 feet of your pool equipment
- Protected from direct weather exposure when possible
- On a solid, flat mounting surface
- Near an appropriate power source
- With adequate clearance for ventilation and access
- Within Wi-Fi range (if applicable)
Most controllers include a template for marking mounting holes. Use this to ensure proper alignment.
2. Mount the Control Panel
- Position the mounting template and mark hole locations
- If mounting on masonry, use appropriate masonry bits and anchors
- Pre-drill mounting holes
- Secure the mounting bracket or backplate
- Attach the control panel to the mounting bracket
- Verify the unit is level
Leave adequate space below the control panel for wire routing and connections.
3. Connect Power Supply
Important: This step should only be performed with the power turned off at the circuit breaker.
- Locate the power terminals on the controller
- Route the appropriate gauge wire from your power source
- Connect the hot, neutral, and ground wires according to the controller's wiring diagram
- Secure all connections and verify they're tight
- Label wires for future reference
Different controllers have varying power requirements—some need 120V, while others require 240V. Check your specific model's requirements and ensure your power supply matches.
4. Connect Pool Equipment
Follow your controller's wiring diagram to connect each piece of equipment:
Pump Connection:
- Identify the pump relay terminals on the controller
- Run wires from the controller to the pump
- Connect wires according to your pump's specifications
- For variable-speed pumps, connect both power and communication wires
Heater Connection:
- Locate heater terminals on the controller
- Connect the appropriate wires per the heater's requirements
- For "smart" heaters, connect the communication cable
Lighting System:
- Identify lighting terminals on the controller
- Connect lighting wires according to your lighting system's specifications
- For color-changing lights, ensure proper connection of any control wires
Additional Equipment:
Connect any additional equipment (salt chlorinator, water features, spa jets, etc.) following the manufacturer's instructions.
5. Install Sensors and Probes
Most advanced controllers include temperature sensors and may have optional pH, ORP, or other chemical sensors:
- Install the water temperature sensor at the recommended location (typically after the filter)
- For air temperature sensors, mount in a shaded area away from direct sunlight
- If using chemical sensors, install according to manufacturer recommendations, typically in a flow cell or sampling line
Ensure all sensors are securely mounted and connectors are fully seated.
Software Setup: Configuring Your Smart Controller
1. Initial Power-Up and Configuration
- Double-check all connections
- Turn on power at the circuit breaker
- Follow the controller's initial setup wizard
- Set date, time, and location information
- Configure basic system parameters (pool size, equipment types)
During this process, the controller may perform a self-test to verify connections. Pay attention to any error messages or warnings.
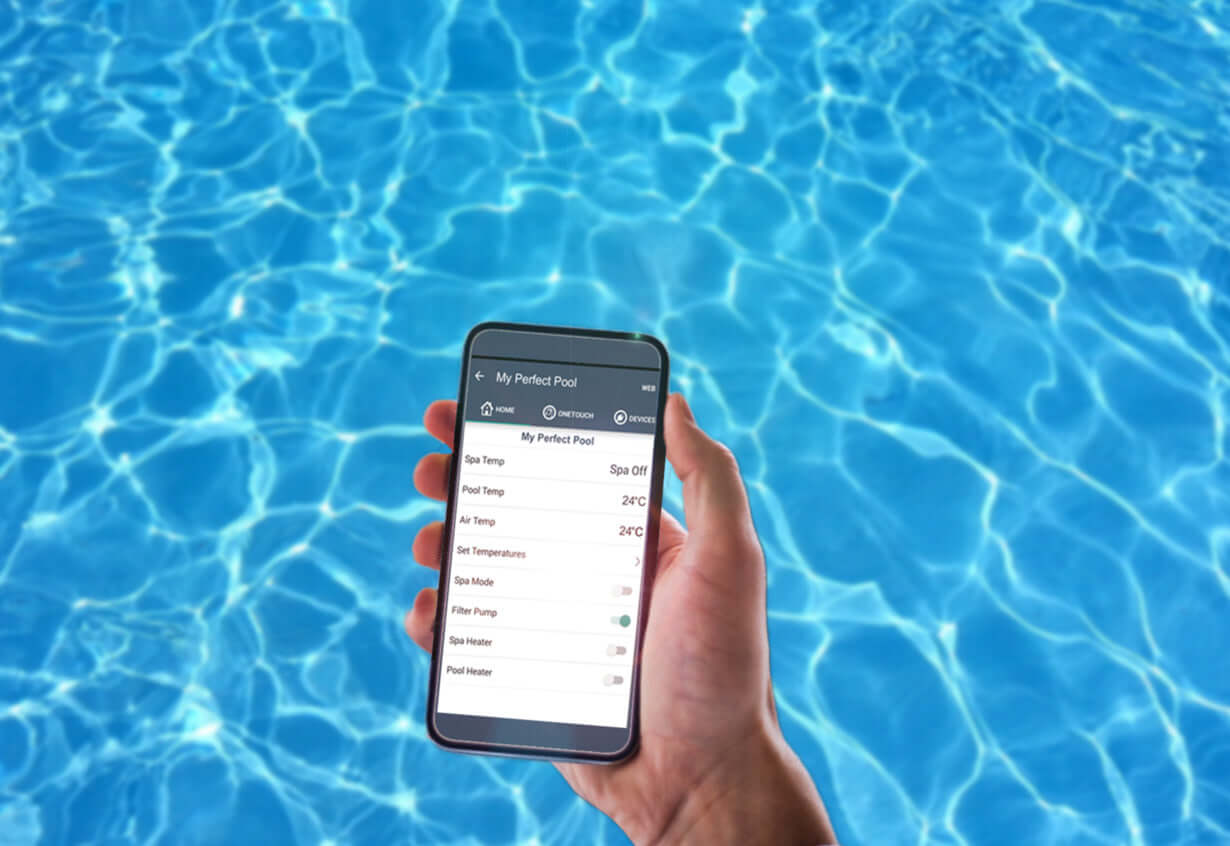
2. Install and Configure the Mobile App
Most controllers require a dedicated mobile app for remote access:
- Download the appropriate app from your device's app store
- Pentair: Pentair Home app
- Hayward: OmniLogic or OmniHub app
- Jandy: iAquaLink app
- Create an account if required
- Follow the in-app instructions to connect to your controller
- Complete the pairing process
- Verify remote connectivity
3. Configure Equipment Settings
Next, program each connected component with appropriate settings:
Pump Configuration:
- Set operating hours/schedule
- For variable-speed pumps, program different speeds for various functions
- Configure priming settings
- Set freeze protection parameters if applicable
Heater Settings:
- Set desired water temperature
- Configure heating schedule if needed
- Program different temperatures for pool vs. spa if applicable
Lighting Control:
- Set lighting schedules
- Program color shows if using color-changing lights
- Configure special event lighting if desired
Chemical Control Systems (if applicable):
- Set target chemical levels
- Configure dosing parameters
- Set up alerts for out-of-range conditions
4. Create Automated Schedules and Scenes
Take advantage of your controller's automation capabilities:
- Set daily filtration schedules
- Create heating schedules based on typical usage patterns
- Program lighting scenes for different occasions
- Configure special modes (party mode, vacation mode, etc.)
- Set up water feature schedules
Consider seasonal needs when programming schedules—longer filtration during peak swim season, freeze protection during winter months.
5. Connect to Smart Home Ecosystem (Optional)
Most premium controllers integrate with popular smart home platforms:
- Amazon Alexa: Enable the controller's skill in the Alexa app
- Google Home: Add the controller device in the Google Home app
- Apple HomeKit: Follow HomeKit pairing instructions if supported
- Control4/Crestron: Consult with your home automation specialist
Integration capabilities vary by controller brand and model. Pentair's IntelliCenter and Hayward's OmniLogic typically offer the most extensive integration options.
Testing and Troubleshooting
1. Perform System Tests
After configuration, thoroughly test all functions:
- Manually activate each piece of equipment through the controller
- Verify proper operation of each component
- Test scheduling by setting a short-term schedule and confirming activation
- Check sensor readings for accuracy
- Test remote access functionality from outside your home network
Document any issues you encounter during testing.
2. Common Issues and Solutions
Connectivity Problems:
- Wi-Fi connection issues: Verify signal strength at controller location, consider a Wi-Fi extender if needed
- App connection failures: Ensure your mobile device has internet access, try closing and reopening the app
Equipment Not Responding:
- Relay issues: Check wiring connections, verify relay operation
- Communication errors: Ensure proper installation of communication cables
- Configuration problems: Review equipment settings in the controller
Sensor Inaccuracies:
- Temperature reading errors: Verify proper sensor placement and connections
- Chemical sensor drift: Calibrate according to manufacturer instructions
For persistent issues, consult the troubleshooting section of your controller's manual or contact the manufacturer's support team.
3. Finalizing the Installation
Once everything is working correctly:
- Secure all wire connections
- Close and secure the controller housing
- Label major components for future reference
- Store all documentation in a safe place
- Take photos of the completed installation for reference
Maintenance and Future Considerations
Regular Maintenance
To keep your smart controller performing optimally:
- Inspect connections: Periodically check wire connections for corrosion or loosening
- Update firmware: Apply manufacturer updates when available
- Calibrate sensors: Follow recommended calibration schedules for chemical sensors
- Clean displays: Gently clean touchscreens and displays as needed
- Backup settings: If your controller offers configuration backup, save your settings regularly
Expanding Your System
As your needs evolve, consider these expansion options:
- Additional equipment: Most controllers can accommodate additional relays for more equipment
- Enhanced sensors: Upgrade to more sophisticated water quality monitoring
- Integration expansion: Connect to additional smart home platforms
- Automated chemical dosing: Add automated chemical feeders for more precise water chemistry
Conclusion
Setting up a smart pool controller involves careful planning, proper installation, and thorough configuration. While the process requires attention to detail, the rewards are substantial: enhanced convenience, improved energy efficiency, consistent water quality, and the ability to manage your pool from anywhere.
Remember that while this guide covers the general setup process, specific steps may vary based on your controller model and pool configuration. Always refer to your manufacturer's documentation for detailed instructions, and don't hesitate to consult a professional for assistance with complex installations or troubleshooting.
With your smart pool controller successfully installed and configured, you're ready to enjoy a new level of pool ownership—one with less maintenance work and more enjoyment of your backyard oasis.
Leave a comment
This site is protected by hCaptcha and the hCaptcha Privacy Policy and Terms of Service apply.